
InfoSec Write-ups – Medium–
Introduction
Phishing attacks are great first-entry vectors with technical details which are frequently overlooked by both white and blackhat hackers.
Having participated in multiple phishing campaigns over the years, both in offensive as well as defensive teams, I’ve learned from trial and error a lot of these things to pay attention to. This article will try to summarize them.
Technical subjects
Even if phishing campaigns are often associated with Social Engineering, they have technical components which you need to be aware of in order to be successful. Some of the topics we will cover (superficially) are:
- Difference between common phishing and spear phishing
- SPF, DKIM and DMARC
- OSINT
- SSL/TLS
- Spam filters
- DNS and MX/SPF/DKIM (txt) records specifically
- Homograph attacks
Considerations
I know a big percentage of the readers just go through the first lines of an article, so let me give you the best advice I can give you now. The first thing that you need to understand is that a phishing attack doesn’t necessarily have to start with an email. Yes, we will cover mostly phishing attacks through email in this story, but there are multiple ways in which you could arrive to a phishing site.
Also, not every phishing site is looking for your credentials or your credit card, or for you to download a malicious file. I’ve heard a lot of people say that as long as you don’t download any file, and you don’t input your credentials / credit card details anywhere, you could go around clicking everything you get sent. This is not true.
I’ve participated on multiple assessments where our entry point was someone clicking on a URL they shouldn’t have, and running a script through an XSS.
Or maybe they want you to send a request and perform an action on your behalf, exploiting a CSRF attack.
Or maybe they just want to exploit your outdated browser with something like metasploit’s browser autopwn (https://blog.rapid7.com/2015/07/15/the-new-metasploit-browser-autopwn-strikes-faster-and-smarter-part-1/).
Maybe they want to beef hook you (https://beefproject.com/).
Maybe the link doesn’t even have a URL but rather a UNC and someone inside your network is trying to relay your credentials (https://github.com/lgandx/Responder-Windows).
Maybe it’s one of the multiple relay attacks that have recently showed up on remote conference software due to the quarantine, in both zoom (https://thehackernews.com/2020/04/zoom-windows-password.html) and team viewer (https://thehackernews.com/2020/08/teamviewer-password-hacking.html)
I could go on, but I’ll stop and hope I’ve given you enough examples to prove the point.
Defining type and scope
One of the first things you need to define with your client is the scope of the campaign. Will this target all of the companies employees or will it target just critical highly privileged employees? In the latter, you’ll want to put together custom emails for each user, using interesting topics that are sure to engage them. This is called spear phishing.
Also, do you want to be able to use the credentials you’ve gathered from your campaign to start a pentest? This is a sensible approach and each company has different privacy policies. If you just want to asses your employees security level, you don’t really need to log every credential. You can just obfuscate a portion of the credentials before saving them and pull statistics.
You need to pre-define your metrics too. Of course you want to know what percentage of users clicked on the link. But you could also log how many times it has clicked the link. How many credentials they’ve tried. Have they tried to reset their password after receiving your mail? How long after receiving the mail? This is all interesting data you should be collecting for your employer.
Setting up the infrastructure
To start our assessment we are going to need information about our target. I’m not gonna go into the OSINT process here, since it is a really broad topic and I’m planning on writing another article about this. But lets just assume you’ve gathered the following information:
- Email addresses of your targets
- General useful info of your recipients, such as time-zone and language (and specific interests if you’re spear phishing)
Now that you have this information, you’re going to need your own smtp server to send the email.
https://medium.com/media/f27fb51d1efc60ad64c3eb1a57ef0961/href
I don’t care how easy Thor makes it look. There are actual time requirements when setting up the required infrastructure, you can’t just send the email from anywhere.
You’re going to need
- A publicly accessible server. You can use any of the cheap providers such as Linode, Digital Ocean, AWS, GCM, etc… (I didn’t name Azure since this tutorial is directed towards the Linux audience). They offer vps as cheap as 5 U$D per month. You don’t need a lot of resources, the cheapest option with 1gb of ram will usually suffice. In our case we used Digital Ocean.
- A domain name for your server.
I wouldn’t be thorough if I didn’t talk about homograph attacks here. They are basically variations of regular letters which look similar to the original letters. Think the Cyrillic Ғ instead of the regular F. This allows you to reserve a domain name similar to the one you want to spoof. I’m not actually a fan of this approach. In my experience, users are more trustful of other variables such as the green padlock in a URL than of the actual name. Besides, using these types of char sets can actually alert automated filters about your malicious activity. Do you really think Facebook hasn’t thought of a bot scanning the internet for new Faceboӧk.com domains? I much rather send a mail from notifications@facenotifier.com. We’ll use godaddy in this tutorial. - A website to receive your users when they click the link (we’ll talk more about how to set this up later).
One consideration that you need to have is that most cloud providers block outbound connections to port 25/tcp (smtp) due to frequent spamming. This means that you’re going to have to contact them to lift this restriction before you can send any email (we had to create a ticket with Digital Ocean’s support).

After buying your domain, you’re going to have to transfer its DNS to your cloud provider’s. Lets say that you purchased the domain totallyrealdomain.com. You would go into godaddy’s DNS settings and make the domain resolve to Digital Oceans nameservers (ns1.digitalocean.com and ns2.digitalocean.com).

After that, you’ll have to configure digitaloceans DNS servers to point your domain to the newly created vps’s IP.
So goddady will point your dns records to digitalocean’s dns records, and those will point to your vps. Simple enough.
SPF
Simply explained, SPF or Sender Policy Framework defines which hosts are allowed to send email for your domain. Remember that SMTP is a really old protocol, developed in a time where security wasn’t as significant as it is today. Anybody can connect to Gmail’s SMTP servers and send an email claiming to be anyone, so security measures were put in place to prevent this. One of these measures is SPF, and it allows you to define on your domain name’s DNS records the set of IP’s which are authorized to send mail. So when Gmail gets an email claiming to be from totallyrealdomain.com, it will go to totallyrealdomain’s DNS records, and look for a TXT record defining a SPF policy. If the IP from where the email came is listed there, the email gets a PASS on the SPF policy.
You can query specific TXT records like this:

I wont go in depth with SPF record’s syntax, but this record basically means that only domains listed under the A record that defines mail.totallyrealdomain.com should pass the SPF check.
DKIM
DomainKeys Identified Mail (or DKIM for short) is, simply put, digital signing for your emails. Again, I’m simplifying the concepts so that this doesn’t become a 5000 words write-up, but with DKIM you basically
- Generate a hash based on your email content (both headers and body)
- You sign it with a private key
- You send the signed hash along with the email
When receiving the email the recipient should
- Use your public key (listed under a DNS TXT record) to verify the received hash.
- Compute its own hash based on the content of the email received.
- Compare the received hash and the computed hash to verify that the email hasn’t been altered in transit, and that its digitally signed by the sender.
This might seem confusing, but it all comes down to having a DNS TXT record with your DKIM public key.
To query your DKIM record, you’re going to need what’s called a selector. This is used to indicate where in the DNS does the public key reside. The DNS entry will be located in selector._domainkey.domain. In our case, we’ll use the selector “mail”, which means that we need to query the txt records for mail._domainkey.totallyrealdomain.com.

If you’re curious about the record format, you can see the syntax explained here, but the important part is that the public key is the base64 encoded string under the p= parameter. In this case it been splitted up due to exceeding the maximum size limit for a DNS record.
Trying out SPF and DKIM:
Let’s implement these two registers and see how we do against mail-tester.com! We can configure them with the following script. You just call it with
./autoPhisher.sh $hostname
and it’ll install everything and print the DNS records that you need to add. After running it, we can test it with the following command (make sure to replace the destination email address with the mailbox you got on mail-tester.com)
echo "Testing mail" | mail -s "$(echo -e "Test Email\nFrom: John Doe <no-reply@totallyrealdomain.com>\nReply-to: no-reply@totallyrealdomain \nContent-Type:text/html\n")" -r no-reply@totallyrealdomain test-s211hrdl7@srv1.mail-tester.com

This doesn’t look like such a great score, doesn’t it? But don’t worry, we just want to verify that all the measures we needed on the infrastructure side are working correctly. Looking at the details, we see they are:
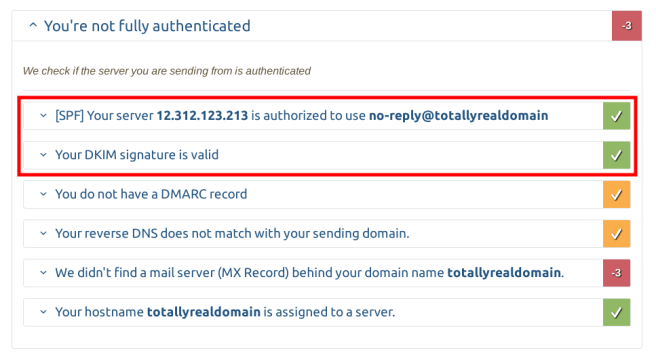
We’re almost done on the infrastructure side! There are two more changes we need to make.
MX records
One of the reasons for our low score was a missing MX record on our DNS. This record is suppose to point to your mail servers. Since we’re hosting everything on the same server, lets create it, pointing to our main domain.
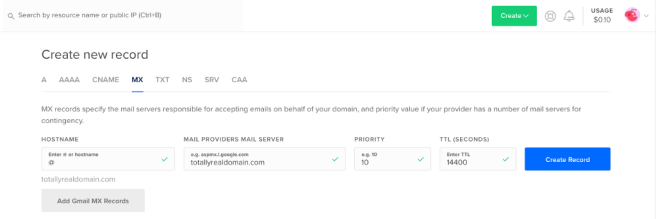
The priority is used when load balancing traffic between different mail servers. We don’t need this since we’ll only have one, so we’ll just leave it at 10.
Reverse NS lookup (PTR records)
One of the observations we got was that our server didn’t have a valid PTR DNS record. This is also known as a reverse lookup, and allows you to query an IP on a DNS server and get the associated hostname.

This PTR record allows the receiving mail server to query the IP address from where the email was sent and see if it has an associated record with a matching domain name.
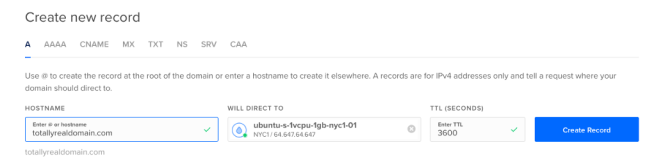
In the case of Digital Ocean, PTR records are automatically generated as soon as you change the name of your droplet with a FQDN format. So we just need to rename our droplet from ubuntu-s-1vcpu-1gb-nyc1-01 to totallyrealdomain.com

Depending on the TTL you configured, we need to wait for the DNS changes to propagate, but in the meantime you can query the changes on digitaloceans nameservers with:

After waiting, we try again and see a big change in the score.
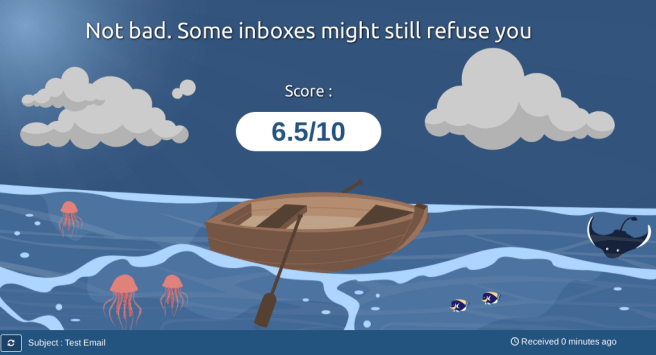
It’s not perfect, but we’ll get there. At least we’re all set on the infrastructure side of the setup. This is the higher score we can get with a simple text mail.
I’m going to wrap up part one here. In part 2 we’ll see how we can polish our emails to make them close to a perfect 10, as well as little tricks that you can do to improve your reception percentage.
Recipe for a successful phishing campaign (part 1/2) was originally published in InfoSec Write-ups on Medium, where people are continuing the conversation by highlighting and responding to this story.
